| نصب | +۲ هزار |
| از ۴ رأی | ۳ |
| دستهبندی | سبک زندگی |
| حجم | ۲ مگابایت |
| آخرین بروزرسانی | ۲۶ فروردین ۱۴۰۲ |

| نصب | +۲ هزار |
| از ۴ رأی | ۳ |
| دستهبندی | سبک زندگی |
| حجم | ۲ مگابایت |
| آخرین بروزرسانی | ۲۶ فروردین ۱۴۰۲ |
تصاویر برنامه


معرفی برنامه
Designed for the use of microblading and micropigmentation artists.
This application is used in a very easy way, it only requires 6 simple steps:
Step 1: Open the application.
To open the application you must press the BeautyPro Symmetry App International On the display of the device you downloaded it to.
Step 2: Align the client's face on the screen.
The first thing to do is to position the screen of the phone horizontally and frame the face using the two horizontal lines, positioning them on the upper arches of the eyebrows (point 2), and the central vertical line position it on the line Vertical previously plotted to the center of the Nose Bridge.
Step 3: Capture the picture.
Once the face is centered as shown in step 2, take the picture with the button located on the center and on the right side of the screen.
Step 4: Using the "Grid" function.
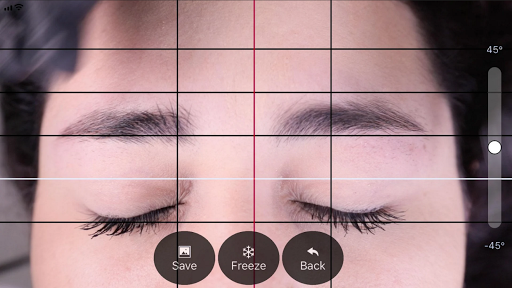
Immediately after capturing the image will appear the newly taken picture with 4 horizontal lines of black color and one more white, these lines can be adjusted and frozen activating the function "Grid", touching the button with that name.
Step 5: Adjusting the vertical lines.
In the same way the vertical lines of the "Grid" can be adjusted, these lines consist of a central line of red and two other sides of black color, the position of these two lines depends directly on the position of the red vertical line, this centerline We position it on the centerline of the bridge of the nose previously marked, and with the black lines define the separation between the beginnings of the eyebrows.
Step 6: Adjust Level and Zoom.
If necessary, you can adjust the picture taken in two ways, one of which is by turning it to adjust the level of the image, sliding up or down the adjustment control positioned on the right side of the screen, and another to amplify it using 2 Fingers.
Step 7: Once the lines are correctly positioned at the points mentioned, we will be able to save the image in the photo reel of our device (phone, Tablet, etc....) by pressing the "SAVE" button or if you want to delete the captured image and Taking a new picture you must press the "BACK" button to start again.


برنامههای مرتبط


دیگران نصب کردهاند


برنامههای مشابه


